
Lighting, Sound and On-Camera Aesthetics for Better Video
Last updated: March 8, 2026

If a video looks decent but sounds thin, echoey, or distant, most viewers will feel the drop in quality before they can explain it. If the sound is clear but the face is poorly lit, skin tones shift, or the background fights for attention, the result still feels harder to trust.
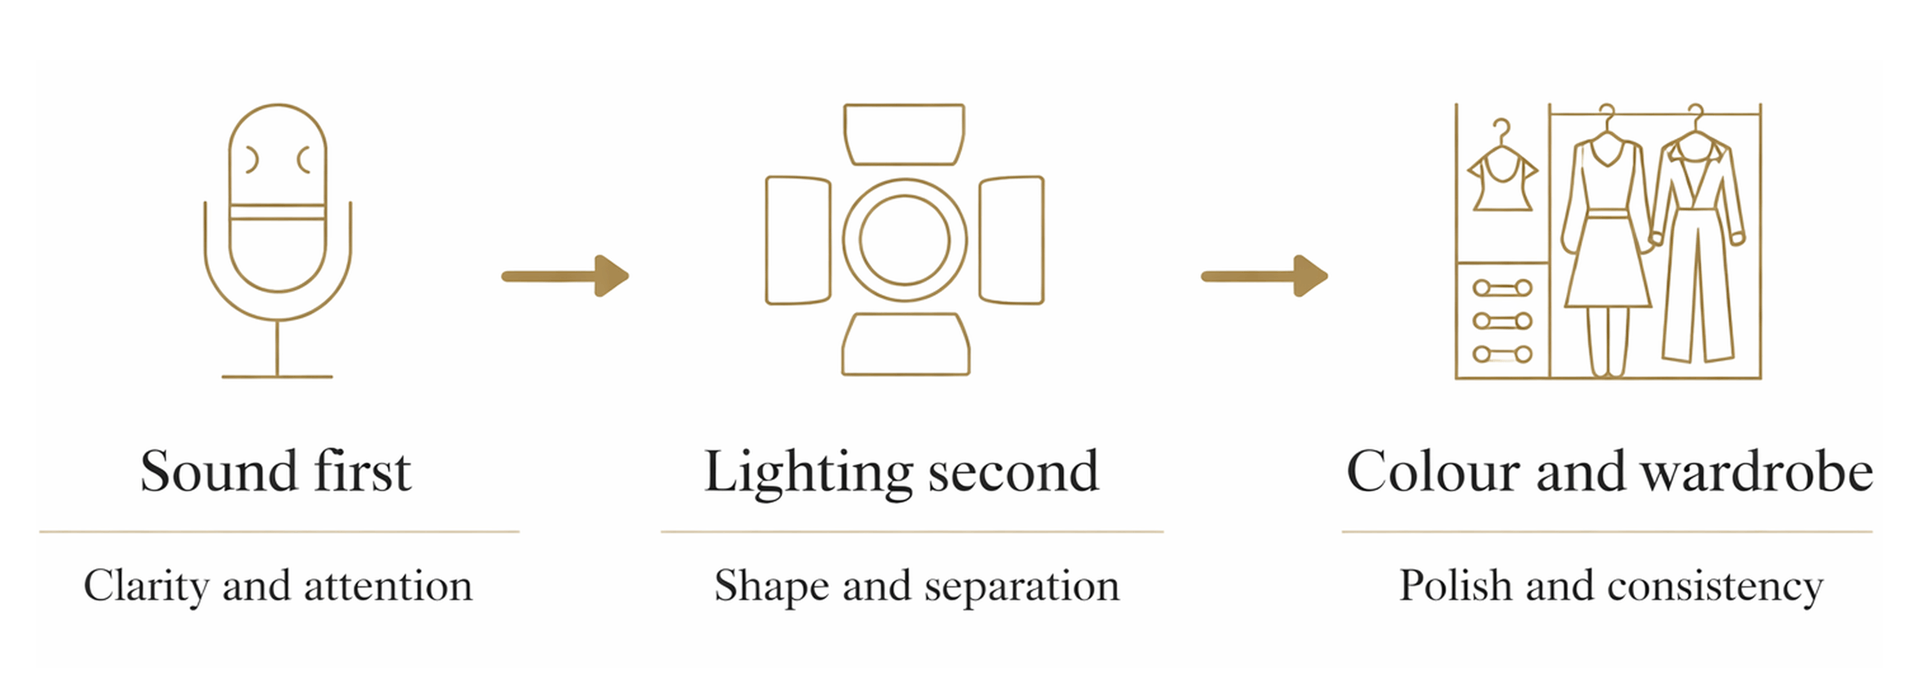
That’s why lighting, sound, and on-camera aesthetics work better as one system than three separate fixes. On most real shoots, the most reliable order is simple. Fix sound first. Shape the light around the room you actually have. Then refine colour, wardrobe, and background so the frame feels calm, clear, and intentional.
If you’re a film student, solo creator, teacher, or part of a small team, this guide gives you a repeatable way to make talking-head videos, interviews, and small-room shoots feel stronger without overcomplicating the setup. It gives you the big picture first, then helps you move into the right area when you need more depth.
It focuses on the fundamentals that improve results most reliably. It doesn’t try to cover every advanced technique. The aim is to help you make better decisions before you record, spot the issues that matter most, and understand how each part of the setup affects the rest.
What this guide covers
This guide focuses on the parts of video quality that viewers notice fastest in real-world talking-head and interview setups. It covers the order that tends to save the most time, how to spot common problems before recording, and where to go next if your main issue is sound, lighting, colour consistency, or on-camera presentation.
It also acts as the central guide for this topic cluster. If you want more depth on lighting setups, ambient sound, colour temperature, or wardrobe choices, this page helps you understand how those choices connect before you move into the more focused guides.
Explore this guide
If there is one section to start with, begin with Why Lighting, Sound and On-Camera Aesthetics Work Together. It sets the frame for the rest of the guide and helps you make better decisions on real shoots.
- Why Lighting, Sound and On-Camera Aesthetics Work Together
- Symptoms to Fix Fast
- Start With Sound Foundations That Hold Attention
- Build Lighting That Works in Real Rooms
- Keep Colour and White Balance Consistent
- Help People Look Clear and Feel Comfortable on Camera
- Put It All Together With a Simple Pre-Shoot Workflow
Why Lighting, Sound and On-Camera Aesthetics Work Together
Sound matters more than most people expect at the start. Clean audio keeps viewers watching even if the picture is not perfect. Poor sound makes people click away fast, no matter how nice the lighting looks.
That’s partly because how sound design choices shape attention and pacing affects the way a viewer experiences the whole piece, even before they notice the visuals in a conscious way.
Lighting sets the mood and flatters faces, but it can also create or reveal problems with colour and background. On-camera aesthetics add the final polish through wardrobe and background choices that work with both light and sound.
Tackling these in the right order saves time and frustration. Most reliable setups start with sound, move to lighting, and finish with aesthetics.
The main advantage of treating these as one system is not just better quality. It’s better decisions. Once you start in the right order, you waste less time chasing symptoms that were created by an earlier mistake.
A useful rule on most small shoots is this. Get the speech clear. Place the subject and shape the light. Then check colour, wardrobe, and background once the frame is already stable.
Symptoms to Fix Fast
Most setup problems show up in the same places first, sound clarity, facial lighting, colour consistency, and subject separation from the background. Spotting these early matters because they’re usually much faster to fix before recording than in post.
Use this section as a quick pre-shoot scan, not a full diagnosis. If you can identify the symptom clearly, you can usually narrow the cause and make a better first adjustment without changing everything at once.
These common setup issues ruin more videos than bad gear ever could. Spot them early and you will save hours in post.
Harsh facial shadow
Strong shadow on one side of the face can make the subject look uneven, tired, or unintentionally dramatic. This often happens when the light is too hard, too high, or placed at an awkward angle.
Mixed warm and cool light
When warm indoor light and cooler daylight are hitting the subject at the same time, skin tones can shift and footage starts to look inconsistent. This usually shows up as orange and blue casts in the same shot.
Blown highlights on skin
Bright patches on the forehead, cheeks, or nose are difficult to recover cleanly in post once they are clipped. These highlights often come from overexposure, hard light, or reflective angles on skin.
Distracting background clutter
A busy background pulls attention away from the subject and makes the frame feel less intentional. Even small items behind the subject can become distracting once the shot is recorded and viewed back.
Poor subject separation
When the subject blends into the background, the frame can look flat and harder to read. Separation usually improves with better light direction, more contrast, or a little extra distance from the background.
Quick Diagnosis Table
Use this table when you can identify the symptom but you are not yet sure what caused it. It’s designed to help you make a sensible first check before changing multiple settings at once. Most creators lose time by changing lighting, camera settings, and audio setup at the same time.
| Problem you can see or hear | What usually causes it | What to check first |
|---|---|---|
| Voice sounds echoey or distant | The mic is too far away, the room has too many hard reflective surfaces, or background noise is more obvious than expected | Mic distance, nearby hard surfaces, and room noise before changing gear |
| Audio is clear but the video still feels flat | The subject is too close to the background, the light is too front-on, or the frame lacks depth and separation | Subject-to-background distance, light direction, and whether the frame has enough contrast and depth |
| Skin tones look orange or blue | Mixed light sources are competing, or auto white balance is shifting between shots | Turn off unnecessary lamps, identify the warm and cool sources, and set white balance with one main light source in mind |
| Highlights on skin look blown or shiny | Exposure is too high, the light is too hard or too direct, or reflective skin and surfaces are catching the source awkwardly | Overall exposure, light angle, and whether highlights are clipping on zebra stripes, a histogram, or false colour |
| Face looks flat and blends into the background | The light is too front-on, the subject is too close to the wall, or there is not enough contrast and separation in the frame | Light direction, subject placement, and distance from the background |
| Clothing looks dull or clashes with the background | Wardrobe colour is too close to the background, the fabric reacts poorly under the lighting, or there is not enough visual separation | How the clothing looks under the actual lighting, the background tone behind it, and whether there is enough contrast between subject and setting |
| Video looks inconsistent between clips | Auto exposure or auto white balance is changing as the subject moves or the light shifts between takes | Lock exposure where possible, set white balance deliberately, and use a grey card if you need more consistency across shots |
Start With Sound Foundations That Hold Attention
If viewers need to work harder to understand the speech, the rest of the setup has less room to succeed. That’s why sound comes first.
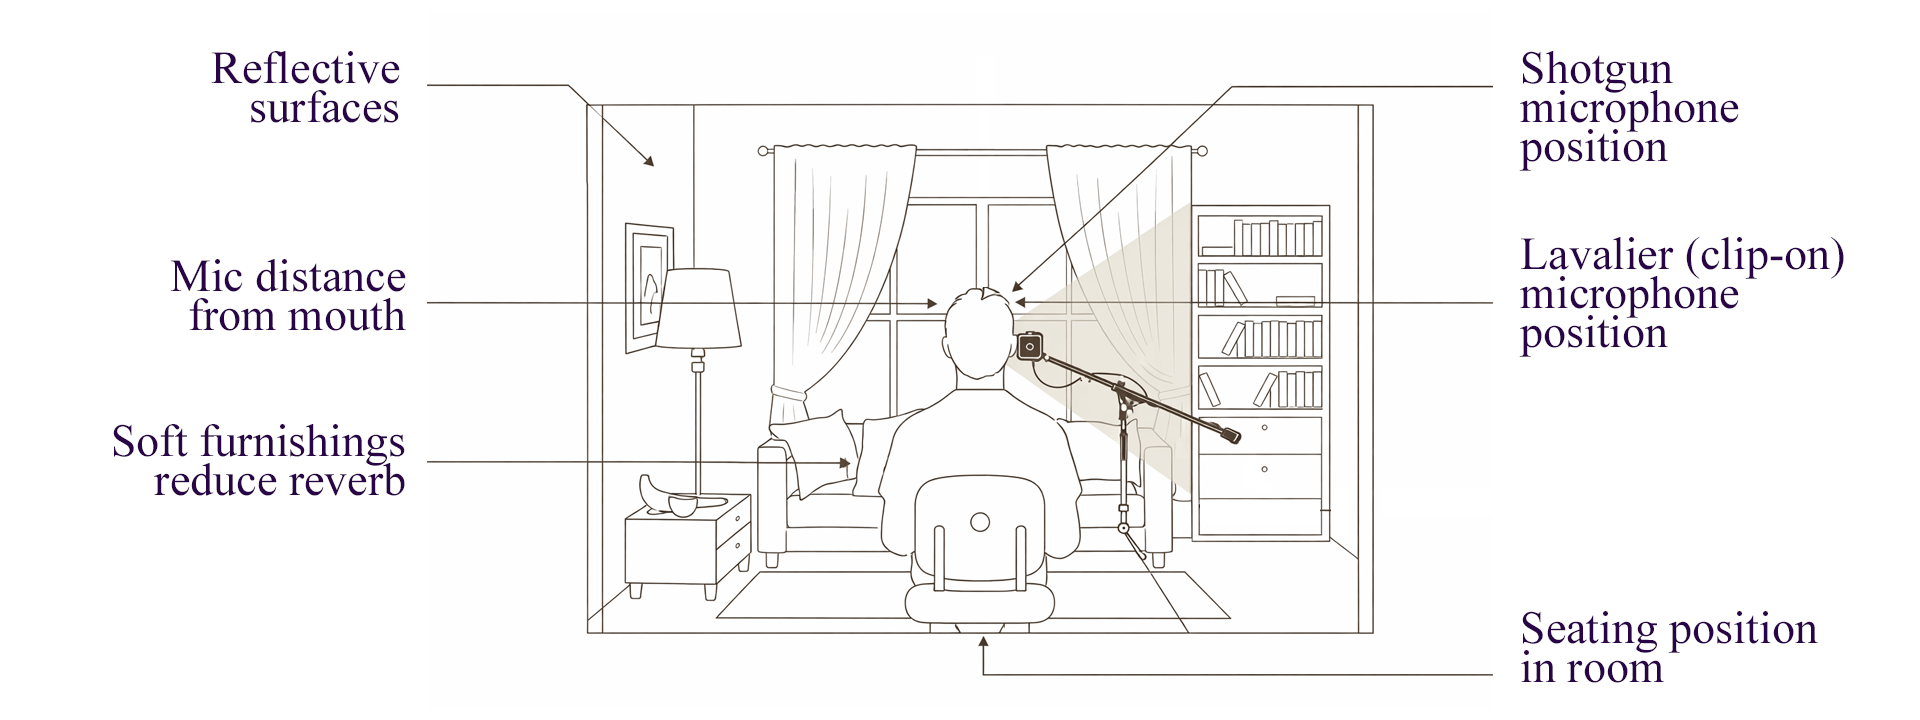
On many small shoots, the biggest audio mistake isn’t the microphone itself. It’s choosing a room that sounds bright, bare, and reflective. Even a decent mic can struggle in a space full of hard walls, empty tables, glass, and bare floors. By contrast, a simpler room with softer surfaces often gives you a better starting point before you touch any settings.
Start by listening to the room before the subject speaks. Air conditioning, road noise, fridges, footsteps outside, and computer fans often sound minor in person but much more obvious in a recorded clip. It’s easier to remove a distraction before recording than to rescue it later.
Use this quick sound check map to review mic placement, room reflections, and common noise factors before recording.
Mic placement matters next. Bring the microphone as close as you can without making it distracting. In many cases, getting the mic closer improves the result faster than upgrading the camera or adding more lights. A useful first test is to record ten seconds of natural speech, then listen back through headphones before the full take.
Ambient sound still matters, but it should be controlled rather than accidental. A room with a little atmosphere can feel natural. A room with random distractions feels careless. Looking more closely at how sound design choices shape attention and pacing can help when you want to use room tone and background detail in a more deliberate way without burying the voice.
Build Lighting That Works in Real Rooms
Once speech is clear, lighting becomes the fastest way to improve how professional the setup feels.
The goal isn’t to make every face look dramatic. The goal is to make the subject easy to read, flattering enough to feel comfortable, and visually separate from the space around them. On most talking-head shoots, one well-placed light does more good than several badly placed ones.
Start with direction, not brightness. A light placed slightly to one side and a little above eye level often gives the face more shape than a front-facing light that flattens everything. If the setup already looks decent but still feels plain, check the direction of the light before adding another fixture.
Small rooms create two common problems. First, the subject ends up too close to the wall, which makes shadows more obvious and reduces depth. Second, the crew tries to overpower the room with extra light instead of repositioning the subject or softening the source. In many cases, moving the chair and changing the angle improves the frame faster than adding more kit.
If you want a more focused breakdown of how to build a clean, repeatable setup, a practical two-point lighting setup is the best next step once your sound is already usable and you want the face, contrast, and background to feel more controlled.
Lighting also connects directly to the wider production choices around interviews. If the subject is stiff, the room is cramped, or the setup time is limited, the way you light the space should support the practical reality of the shoot rather than fight it.
Keep Colour and White Balance Consistent
Once sound and lighting are under control, colour issues become easier to spot and easier to fix.
The most common mistake here isn’t choosing the wrong camera menu option. It’s leaving different light sources to compete in the same room. Window light, warm household bulbs, and practical desk lamps can all push the image in different directions. The result is often footage that looks inconsistent even when exposure appears fine.
A good habit is to decide what the main light source is supposed to be. If daylight is doing most of the work, shape the room around that. If an LED or practical interior look is leading, reduce the influence of daylight where possible. Once one source is clearly in charge, white balance decisions become much easier.
This matters because colour affects more than technical neatness. Skin tone, trust, mood, and continuity all depend on it. Understanding how colour temperature shifts skin tone, mood, and background balance makes it much easier to avoid the mixed-light feel that often makes footage look less polished than it should.
This is also where future cluster posts in this guide will sit naturally. White balance mistakes, mixed lighting indoors, and window-plus-LED setups all belong here because they build on the same principle. Keep one dominant source where you can, then make deliberate choices around it.
Help People Look Clear and Feel Comfortable on Camera

Wardrobe choices affect more than style. Colour, contrast, and separation from the background all change how clear and confident someone looks on camera.
Wardrobe and background choices can support your lighting or fight against it, but the bigger issue on many shoots is comfort. If someone feels awkward about what they’re wearing, what is visible behind them, or how they look on screen, it often shows in posture, expression, and delivery.
Start by making the frame easier to understand. Tell the person on camera what will actually be visible, whether the shot is tight or wide, and that small changes are normal. A quick preview often helps people relax because they stop guessing.
A few choices prevent most common problems. Avoid tight stripes or fine patterns that can shimmer on camera. Avoid very shiny fabrics that push highlights too far. Avoid jewellery or fabric that rubs against the microphone. If a logo is unavoidable, decide deliberately whether it helps or distracts.
Background choices matter just as much. A technically acceptable frame can still feel amateur if the wall is cluttered, objects seem to stick out from behind the subject, or the person blends into the room. In many cases, a small shift in angle or more distance from the wall improves both the look of the frame and the confidence of the person speaking.
The most common wardrobe mistake isn’t choosing the wrong colour in isolation. It’s choosing a top that disappears into the background once the lighting is set. It helps to know which clothing colours tend to look better on camera so you can create cleaner separation and avoid choices that fight the frame.
Put It All Together With a Simple Pre-Shoot Workflow
A repeatable workflow matters because most problems on set are linked. Fixing the issue in the wrong order often creates more work.
A practical sequence for small shoots looks like this.
Listen to the room and test the mic
If the speech sounds poor, fix that before anything else.Place the subject and shape the main light
Work with the room you actually have. Don’t assume more gear will solve a weak starting position.Check the frame for colour consistency
If the room feels mixed, decide which source is dominant and simplify the rest.Preview wardrobe and background in the actual shot
Don’t trust how they looked in person. Check how they behave in frame.Record a short test clip and watch it back with sound
A ten-second check often catches problems you’d otherwise notice only after a full take.
Each stage supports the next one. Sound affects perceived quality first. Lighting affects clarity and trust. Colour affects consistency. On-camera choices affect how calm and intentional the setup feels.
A Simple Way to Use This Before Every Shoot
The aim isn’t to make every setup look expensive. It’s to make each decision support the next one so the final video feels steady, clear, and intentional. When sound, lighting, and on-camera choices work together, even simple setups tend to feel more professional.
Before recording, run this quick check.
Can I hear the speech clearly without room noise fighting it?
Is the face shaped by the light rather than flattened by it?
Does the colour feel consistent across the frame?
Does the person stand out clearly from the background?
Is anything in the frame pulling attention away from the message?
Have I watched a short test clip with sound before the full take?
That short habit tends to prevent the mistakes that cost the most time later.
Quick recap before your next shoot
Use this as a final check before you press record.
Start with sound, then shape the light, then refine colour, wardrobe, and background.
Fix the room before assuming you need more gear.
Check white balance and exposure before recording full takes.
Use wardrobe and background choices to improve separation, not just appearance.
Record a short test clip and review it with sound before the full take.
Troubleshoot one symptom at a time instead of changing everything at once.
Frequently Asked Questions
Should I start with sound or lighting?
Start with sound. If speech is hard to follow, the rest of the setup has less room to succeed. On most small shoots, fixing echo, room noise, or mic placement does more for perceived quality than changing the lights first.
Do I need to use manual settings?
In many cases, yes. Auto settings can look fine at first, then shift once the subject moves or the light changes. Manual control helps keep exposure and colour more consistent across the take.
What causes skin tone to look wrong on camera?
It’s often a mixed-light problem rather than a camera problem. Daylight, warm room bulbs, and practical lamps can push skin tone in different directions at the same time. It usually helps to choose one main light source and reduce the influence of the others.
How much should I worry about blown highlights?
Quite a lot. Once bright areas on skin are clipped, they’re hard to recover cleanly in post. A short test clip and careful exposure check usually save more time than trying to repair highlights later.
What matters more, wardrobe or background?
Usually the relationship between them. A shirt can look fine on its own but disappear into the background once the lighting is set. What tends to matter most is separation, contrast, and avoiding distracting textures or reflections.
Ready to dive deeper into your main issue?
Use this section when you already know where your setup is struggling and want to go deeper without guessing. Each guide below focuses on a specific problem area, so you can move straight to the part that’s most likely to improve your next shoot.
| Article | Best for | Who it suits |
|---|---|---|
|
|
Building a cleaner talking-head setup with better facial shape, more flattering contrast, and stronger separation from the background | Solo creators, students, teachers, and small teams who need a simple lighting setup they can repeat across interviews, lessons, and pieces to camera |
| Choosing wardrobe colours and clothing choices that work with your lighting and background so the subject stays clear, separate, and free from avoidable distractions | Presenters, interview subjects, educators, talking-head creators, and small teams trying to make straightforward setups look more intentional on camera | |
| Understanding how sound choices influence attention, pacing, and perceived polish when a video looks fine on screen but still struggles to hold attention | Creators shaping story-led edits, talking-head videos, explainers, and short-form pieces where audio needs to support clarity as well as mood | |
| Fixing mixed indoor colour casts, improving skin tone consistency, and understanding how warm and cool light sources change the mood of a shot | Creators filming in homes, offices, classrooms, or mixed-light spaces where colour shifts can make footage feel less controlled | |
| Improving continuity when cuts sound messy, room tone keeps changing, or dialogue feels detached from the space it was recorded in | Interview-led creators, educators, documentary beginners, and small teams filming in real rooms where background sound is hard to control perfectly |