
Basics of Two-Point Lighting for Videos
Last updated: March 8, 2026
If you are just starting out with online videos, lighting can feel like the part that makes everything slower and harder. It is also one of the quickest ways to make a video look clearer and more intentional without changing your camera. Two-point lighting is a practical place to start because it gives you control over faces, shadows, and mood with simple gear.
For most solo creators, the win is not a cinematic look on day one. It is getting a clean, reliable result you can reset quickly next time. If you want the wider picture on lighting, sound, and how people look on camera, this guide works well alongside our video lighting and sound overview.
The exact settings will still vary by room size, wall colour, skin tone, and whether the subject wears glasses, so treat this as a practical starting point rather than a fixed recipe. By the end, you will know how to set it up on a budget, avoid common pitfalls, and decide what to adjust first when the image looks wrong.
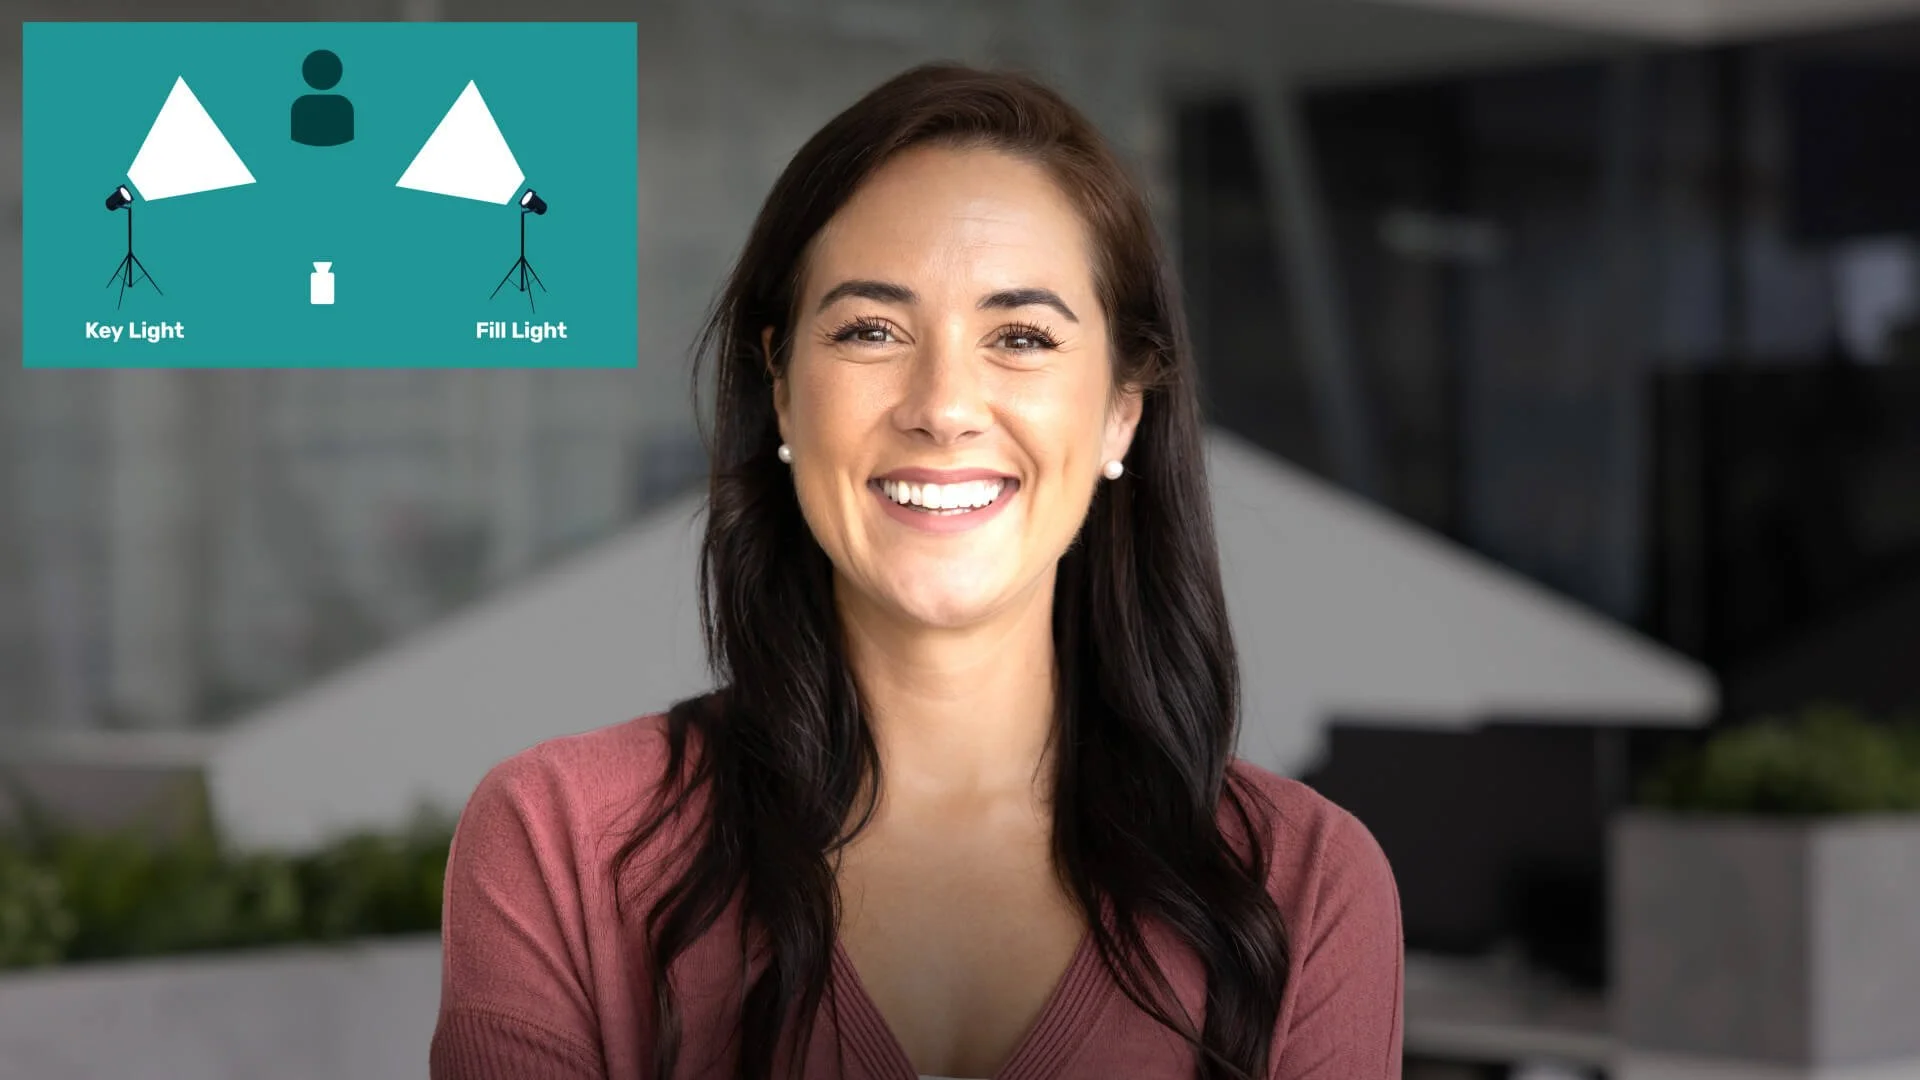
What Is Two-Point Lighting in Video Production?
Two-point lighting means using one main light and one supporting light on your subject. The key light is the main source that creates the shape of the face and sets the direction of the light. The fill light reduces the harshness of the shadows created by the key so the image stays clear and flattering.
You are not trying to remove every shadow. You are trying to control them. If both sides of the face look equally bright, you have often added too much fill. That is not always wrong, but it usually gives a flatter look than most beginners expect.
This setup is great for online videos because it cuts down harsh contrast and makes faces easier to read on phones and laptops. Unlike more complex setups, it is quick to arrange and works well with everyday gear. It is especially useful when you need a repeatable look across multiple shoots.
Hollywood often uses three-point lighting with a key light, fill light, and backlight. That remains a useful reference point, but beginners do not need the full setup to get better results quickly. A two-point setup is often enough for talking-head videos, tutorials, and simple interviews. If your subject already separates well from the background, two-point may be enough. If they blend into a dark wall or busy space, a third light may help later.
Video animation illustrating differences between key and fill lights.
The Key Light
Let us talk about the key light first. This is the brightest light in your two-point lighting setup. It highlights your subject’s features and creates gentle shadows for dimension. The key light targets the main subject of the video and acts as the primary light source.
In practice, the key light usually does most of the visual work, so start here before adjusting anything else. You can experiment with strength, colour, and angle, but keep one change at a time so you can see what each adjustment is doing on camera. Ask your subject to turn their face slightly left and right while you watch the monitor. That quickly shows whether your key placement still looks good when they move naturally while speaking. If you work solo, record a short clip and review it rather than judging only from a live preview.
Place it at about a 45 degree angle to your subject and slightly above eye level. This often gives a natural-looking result and helps avoid flat lighting. Use an LED panel or even a desk lamp if you are on a budget. If the light looks harsh, soften it first with diffusion or by bouncing it off a wall before moving everything around.
Also check where the key spills into the background. A small reposition can improve both the face and the room at the same time. Once you find a setup that works, note the light position or mark the floor so you can rebuild it quickly on future shoots.
A practical check is to look at the forehead, nose, and cheeks on camera before you record a full take. If the bright side clips before the rest of the image looks balanced, lower the key and reset exposure rather than trying to fix it with more fill.
The Fill Light
Now onto the fill light. It complements the key by filling in darker areas without stealing the show. In a two-point lighting setup, it helps your subject look balanced and approachable.
The fill light will typically not be as strong as the key light. If your lights are the same strength, move the fill further away, diffuse it, or bounce it to soften the effect. For beginners, it is usually better to match colour first and add effects later. A simple target is to keep the shadow side clearly visible while still darker than the key side.
Position it on the opposite side of the key light, further away or dimmer. This keeps some shadows for depth but removes unflattering ones under the eyes or chin. A reflector works very well here if you lack a second light. It bounces existing light back softly and can be easier to control than adding another bright lamp in a small room.
Whichever method you use, check that the fill does not create a second shadow line on the nose or jaw. If it does, soften or reposition it. When in doubt, reduce the fill slightly and review a test clip before adding more.
Key Differences Between Key and Fill Lights
The key light is your main shaping light. It is usually brighter and more directional, and it defines the overall look of the scene. It casts the primary shadows and gives the subject form.
The fill light plays a supporting role. It is softer or less intense and is positioned opposite the key to reduce shadows without overpowering the scene. Its job is to even things out enough for clarity while keeping depth.
The key creates shape and emphasis. The fill controls contrast and readability.
By understanding these differences, you can make faster decisions when something looks off. If the image feels flat, your fill may be too strong. If the shadows feel harsh or distracting, your fill may be too weak or too hard. A useful starting point is to make the fill noticeably dimmer than the key, then adjust based on the tone you want.
Step-by-Step Guide to Set Up Two-Point Lighting for Videos
Ready to try it? Here is a straightforward guide to setting up two-point lighting for online videos. The aim is to get a usable result quickly, then refine it with short test clips. Treat the first setup as a draft. Small changes after a test clip usually save more time than trying to perfect everything before recording.
Position your subject and camera
Keep the frame natural and imagine a line between the camera and subject. Place the key and fill on opposite sides of that line.
Add the key light
Place it about 45 degrees to one side and slightly above eye level. Check for soft shadows on the far side of the face.
Add the fill light
Place it opposite the key and keep it dimmer, softer, or further away so it reduces contrast without flattening the face. If you have a reflector, try that before adding a second powered light.
Test and tweak
Record a short clip. Adjust distance, height, or diffusion if shadows look too harsh or too weak. Small changes can shift the mood a lot.
Check the background
Keep it simple and make sure the subject does not blend into it. Move the subject away from the wall before adding extra gear.
This setup often takes about ten minutes with practice. Budget options like windows or phone torches can work well. Try not to mix very different light colours unless you want that look, because skin tones can become harder to balance. Before the final take, record a short test and check the face, background, glasses glare, skin hotspots, and wall shadows.
If you plan to reuse the setup, take a quick phone photo of the room and light positions for reference. A simple repeatable setup usually beats a more complex setup you cannot reset quickly.
Shadows as a Stylistic Choice in Video Lighting
Shadows are not just side effects of lighting. They shape mood, tone, and storytelling. In a two-point setup, the key light creates the main shadows and the fill light softens them. The right balance depends on what the viewer needs first, clarity or mood.
For educational and client-facing videos, clarity usually needs to come first. For beginners, aim for balanced shadows. As you gain confidence, use them more deliberately.
Softer shadows from a stronger fill often suit tutorials and explainers. Deeper shadows from a weaker fill can suit dramatic interviews or stylised work, but they can also make exposure and skin texture harder to manage. If your audience is watching on phones in bright rooms, softer shadows often hold up better.
If the look feels dramatic but expressions are harder to read, raise the fill slightly and test again. Shadows can guide attention and support themes, but keep one neutral version as a reference so you always have a safe option if the stronger look feels too heavy in the edit.
Watch how shadows behave when the subject moves. A setup that looks good when someone is still can break once they lean forward or turn to gesture.
Common Mistakes and How to Avoid Them in Video Lighting
Even experienced creators get caught by the same small problems. Make one correction at a time when troubleshooting. That helps you avoid fixing one issue while creating another.
| What you see | Likely cause | What to change first | Extra check |
|---|---|---|---|
| Face looks washed out | Key light is too bright, too close, or too hard for the shot | Lower key output first, then soften the source with diffusion or bounce | Recheck highlights on forehead, nose, and cheeks on a short recorded clip |
| Face looks flat with little shape | Fill light is too strong or too direct | Reduce fill strength, move it further away, or bounce it | Keep the shadow side visible but still darker than the key side |
| Subject blends into background | Good face lighting but weak subject-to-background separation | Move the subject further from the wall before adding more gear | Review the frame for wall shadows and whether the subject outline reads clearly |
| Colours look odd or inconsistent | Mixed colour temperatures or incorrect white balance for the dominant light | Match the main lights in frame to one general colour look, then set white balance | If colour still looks off, check camera white balance before moving the lights again |
| Buzzing or noise in audio | Fan noise, transformer noise, or power supply noise from a light near the mic | Use quieter lights or move the noisy light and power supply further from the microphone | Monitor with headphones and record room tone before the full take |
| Flicker appears on camera | Light output is flickering or camera shutter and frame rate are mismatched to mains frequency | Test shutter speed and frame rate settings that match your local power frequency, then isolate the problem light | Confirm on a short recorded clip, because flicker may not be obvious in live preview |
| Glare in glasses | Key or fill angle is reflecting into the lenses, often with a small or direct source | Raise and shift the key light first, then soften or enlarge the source, then adjust the fill if needed | A small head or eyeline adjustment can help, and if the speaker films regularly, anti-reflective lenses may reduce glare, but recheck reflections after each change |
Variations for Different Online Video Styles
Two-point lighting is flexible. For interviews, keep it neutral so attention stays on the words. For tutorials, place the key so hands or demonstration items stay visible without heavy shadows across the work area. For commentary or personal brand videos, a slightly stronger key with controlled shadows can add shape while keeping the face easy to read. For short social clips, a cleaner brighter setup often holds up better across apps and different screen brightness settings.
You can also add a subtle backlight for more depth, turning the setup into a simple three-point variation. This often helps in storytelling content or whenever the subject blends into the background. In very small rooms, you may get a similar result by moving the subject further from the wall before adding more gear. That is often the simplest improvement and costs nothing.
Experiment based on your style and audience. Once this feels consistent, change one thing at a time, such as fill strength or key angle, so you build judgement without losing reliability. Keep short notes on what worked so the next setup starts from experience rather than guesswork.
Key Takeaways
Two-point lighting uses a key light and a fill light to create a balanced, readable image with shape and depth.
Start with the key light, then add fill gradually.
If the image looks flat, reduce fill before changing everything else.
Small tests on camera are more reliable than judging the setup by eye in the room.
You can get strong results with budget gear, especially if you control light position, diffusion, and background separation.
As your confidence grows, adjust shadow strength to suit the goal of the video, with clarity first for teaching content and more contrast for mood-led work.
Two-point lighting works well because it is simple enough to repeat and flexible enough to refine. Start simple, test short clips, and build a setup you can reuse. In many cases, that will do more for your videos than buying another light too early.