
Colour Temperature in Videography
Last updated: March 9, 2026

Have you ever watched a video feel warm, tense, calm, or clinical before anyone even speaks? In many cases, colour temperature is doing more work than people realise. It affects mood, skin tones, and whether a frame feels natural or slightly off.
For most creators, the problem is not learning what Kelvin means. It is dealing with real rooms where window light, ceiling bulbs, desk lamps, and LED panels all pull the image in different directions. Once you control that, footage often starts to look more intentional straight away. If you are still building a reliable interview setup, a simple two-point lighting setup can make those colour decisions easier to control from the start.
If you are also improving sound, framing, and subject presentation, the broader video setup guide helps place colour balance in the wider setup so you can fix the right issue first.
This article focuses on a practical question that causes a lot of frustration. How do you make colour look intentional instead of accidental when filming in homes, offices, classrooms, or mixed-light interiors?
What colour temperature actually changes
Colour temperature describes the warm or cool appearance of light. Cameras use white balance to interpret that light so white objects look neutral rather than orange, blue, or muddy.
A useful shorthand is that lower Kelvin values usually look warmer, while higher Kelvin values usually look cooler. But Kelvin is not the whole story. White balance and tint both matter. A light can be close in temperature and still lean green or magenta, which is why some rooms look wrong even when the number seems close. ARRI, a long-established maker of professional cinema cameras and lighting equipment, has a useful colour FAQ on this point because it distinguishes colour temperature from green-magenta correction rather than treating them as the same problem.
Use Kelvin ranges as planning anchors, not fixed truths. What tends to matter most on a real shoot is spotting the dominant source and stopping the rest of the room from contaminating skin tones.
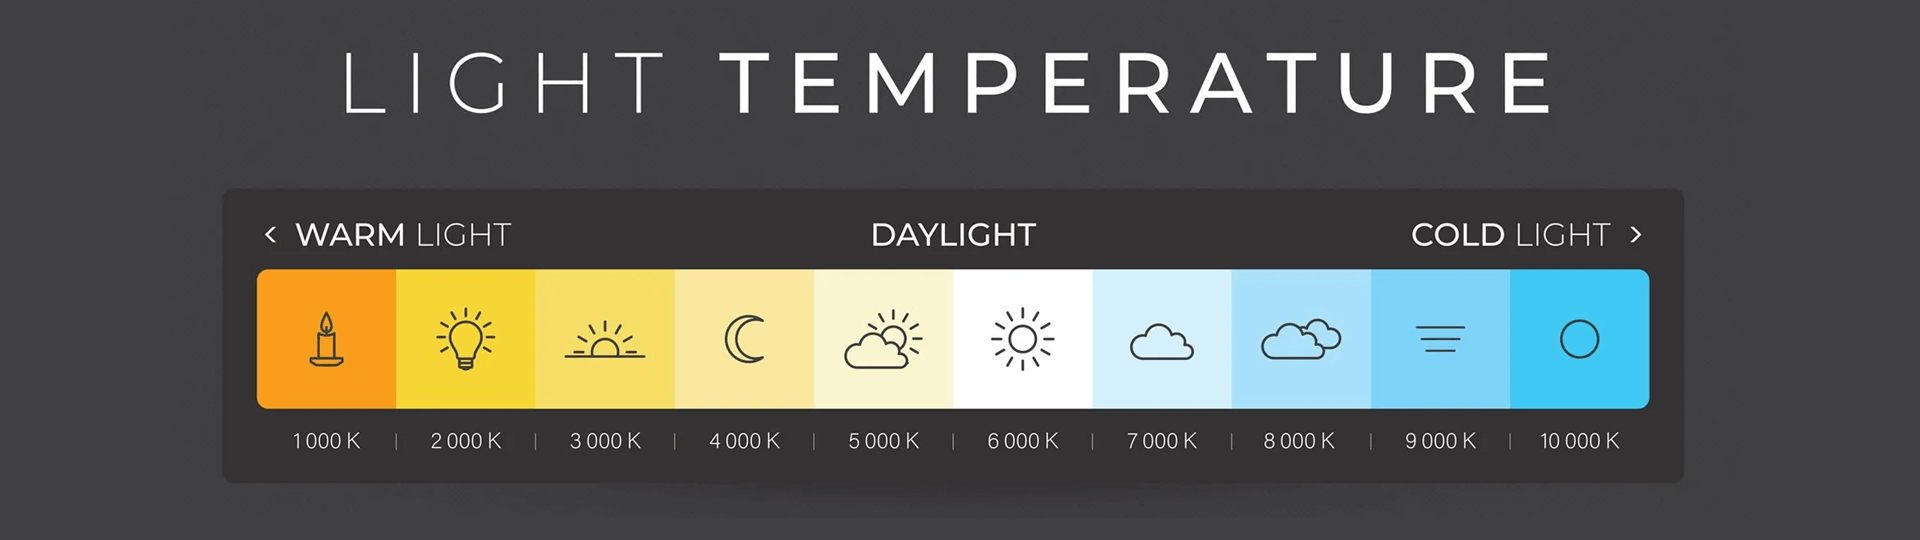
Colour temperature scale from 1000K warm light (candle) to 10000K cold light (shade), with icons and Kelvin values
| Kelvin Range | Light Source Example | Mood Evoked | Best Use in Videography |
|---|---|---|---|
| 1800K–2500K | Candlelight, very warm practical bulbs | Intimate, nostalgic | Stylised evening scenes, cosy interiors, reflective storytelling |
| 3000K–3200K | Tungsten bulbs, tungsten-balanced fixtures | Warm, familiar | Interviews and interiors where you want warmth without a heavy orange cast |
| 4000K–4500K | Neutral LEDs, some office lighting | Balanced, restrained | Classrooms, offices, product demos, practical mixed-use rooms |
| 5000K–5600K | Daylight, daylight-balanced LEDs | Clean, natural | Window-lit interviews, outdoor pieces to camera, general talking-head setups |
| 6500K–7500K | Overcast sky, open shade | Cool, crisp, slightly distant | Cooler exterior looks, controlled tension, continuity on cloudy days |
Psychological and emotional impact
Colour temperature is not only a camera setting. It also shapes how a viewer feels about a scene before anyone speaks. Warmer light often feels more personal, welcoming, or reflective. Cooler light can feel cleaner, more distant, or more tense.
That is why colour choices matter in both filmmaking and brand video. A warmer setup may suit a testimonial, interview, or story-led piece where you want connection. A cooler setup can work well for product-led visuals, modern interiors, or scenes that need a more restrained feel.
The important point is not that warm is always better or cool is always more professional. It is that repeated colour choices can help give your work a recognisable tone, especially when they support the subject, setting, and message.
Warm light can make an interview feel friendlier, more reflective, or more personal. Cooler light can feel cleaner, sharper, or more distant. Neither is automatically better. The better question is whether the colour supports the subject, the room, and the feeling you want the viewer to take from the shot.
Why colour temperature matters in real footage
The most obvious benefit is consistency. If one clip is warm, the next is blue, and a third shifts somewhere in between, the edit starts to feel patchy even when exposure looks acceptable.
Skin tones are where colour problems usually become most visible. A background can tolerate a stylised cast if it looks deliberate. Faces usually have less room for error. That is why experienced shooters often protect skin first, then decide how much warmth or coolness the rest of the frame can carry.
This is also why mixed lighting causes so much frustration. It is one thing to warm or cool an entire shot. It is another to correct a face that is half lit by a blue window and half by a warm ceiling bulb. In that situation, the problem is not just colour temperature. It is competing light sources with different temperature and often different tint.
What tends to go wrong in real rooms
In many home and office shoots, colour falls apart in the same few ways. This quick table helps diagnose the issue before you start moving every light in the room.
| What You Notice | What Is Usually Happening | Best First Fix |
|---|---|---|
| Faces look orange but the window looks blue | Warm interior bulbs and cooler daylight are both hitting the subject | Choose one source to lead and reduce the other on the face |
| Skin looks green even after white balance | The issue is tint or poor source quality, not just Kelvin | Change the lamp, add tint correction, or move the subject away from that source |
| Clips shift between takes | Auto white balance is changing as the frame changes | Lock white balance with a preset or custom setting |
| The background feels warmer or cooler than the face | The subject and background are being lit by different source types | Decide whether that contrast is intentional, then rebalance or simplify |
| The shot still feels off after matching Kelvin | Temperature is close, but tint, exposure, or source quality is still wrong | Check tint, skin highlights, and the fixture itself before chasing another number |
How to control colour temperature on a real shoot
Pick one source to lead
This is the change that usually matters most. Decide whether daylight, a practical interior look, or your video light is supposed to be the main source. Once that decision is made, shape the room around it. Turn off the bulb that fights the shot. Close the blind that contaminates the side of the face. Move the subject so the cleanest light does most of the work.
Mixed lighting is much harder to tidy up later than one consistent source.
Lock white balance instead of leaving it to chance
Auto white balance can be fine for casual clips, but it often shifts between takes or as the subject moves. For work that needs continuity, use a preset, dial in a Kelvin value yourself, or set a custom white balance with a grey card.
A neutral card gives the camera a better reference than guessing from the scene. It is especially useful if you are matching more than one camera or returning to the same setup later.
Protect skin tones first
Background colour can be stylised later. Unpleasant skin tone is much harder to disguise. When you are deciding whether to warm or cool a setup, check the face before anything else. If the skin looks believable and flattering, you have more room to let the room lean warm or cool around it.
Keep the correction simple
Beginners often try to fix colour by adding more sources. In many cases that makes the room harder to control. A cleaner approach is to remove the light that is causing the cast, set one sensible white balance, and record a short test clip.
If the shot is slightly cool but consistent, that is usually easier to refine later than a frame with several competing casts.
Real-world examples of colour temperature in practice
These two examples use the same fictional drama about two estranged friends reuniting after many years. They show how colour temperature can shift the emotional meaning of a scene, even when the shoot itself is constrained by time, safety, or location.
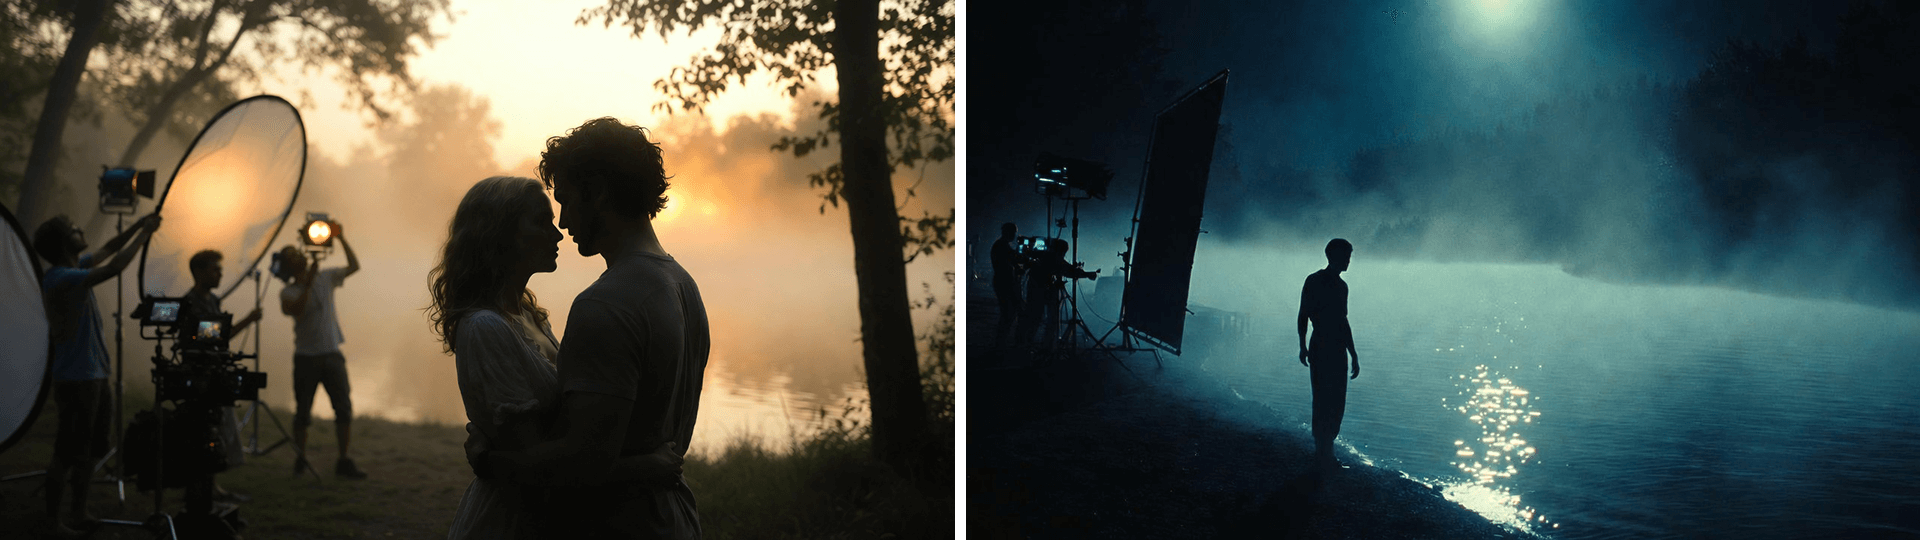
The same lakeside setting lit two ways, with warm golden tones suggesting reunion and cooler blue tones creating distance and tension
Scenario 1. Making midday feel like dawn
The story opens with a reunion by a quiet lakeside. The scene needs to feel hopeful and gentle, with the soft warmth people associate with early morning.
The problem is that filming happens at noon, when daylight is harder and less forgiving. To move the image closer to dawn, the crew softens the sunlight, reduces harsh contrast, and introduces warmer light so skin and highlights feel more welcoming.
The result is not just a technical correction. The warmer image supports the emotional reset in the scene. It helps the reunion feel open rather than exposed.
Scenario 2. Making the same location feel colder and more distant
Later, one of the characters returns to the same lakeside alone. This time the scene needs to feel tense, isolated, and emotionally unresolved.
Although it is still shot in daylight, the look is pushed in the opposite direction. The light is controlled so the frame feels cooler, cleaner, and less forgiving. Blue-leaning tones create a sense of distance, even though the location itself has not changed.
That contrast is what makes colour temperature so useful in videography. The same place can feel reassuring or emotionally cold depending on how the light is shaped and balanced.
What post-production can fix and what it usually cannot
Editing software can absolutely help with smaller mistakes. Temperature and tint controls in tools such as DaVinci Resolve or Adobe Premiere Pro are useful when a clip is slightly too warm, slightly too cool, or just needs a cleaner neutral point.
What post-production usually does less well is untangling a face lit by different colours at the same time. If one side of the skin is blue from a window and the other is orange from a bulb, you can improve it, but you may not make it look fully natural without more selective work.
That is why it still pays to simplify the light before you record.
Beginner-friendly ways to get better results
If you are new to colour temperature, start with habits that make the biggest difference first.
Use built-in white balance pre-sets as a starting point. Daylight and Tungsten are often enough to stop obvious colour problems quickly.
Try a grey card when consistency matters. It gives your camera a neutral reference and can save time when you are filming in the same setup more than once.
Stick to one main light source where you can. Mixing window light with household bulbs is one of the fastest ways to make skin tones look uneven.
Use post-production for smaller corrections, not rescue work. Software can fix a mild cast more easily than a face lit by two conflicting colours.
Pay attention to how light changes through the day. That habit often improves results faster than buying another light.
These small habits usually build confidence faster than chasing exact Kelvin numbers in every room.
FAQ: Colour Temperature in Videography
What colour temperature is best for indoor videography?
There is no single best number for every room. In many cases, what matters more is whether the room is being led by one coherent source. If you are working with warm practical bulbs, you may be near 3200K. If you are shaping around daylight or a daylight-balanced LED, you may be nearer 5600K.
Should I use auto white balance for video?
For casual recording, it can be fine. For interviews, explainers, and anything you may edit across multiple takes, a locked pre-set or custom white balance usually gives you more consistent results.
Can I fix colour temperature after shooting?
Often yes for smaller mistakes. Modern editing tools make temperature and tint adjustment straightforward. They are less convincing when different colours are hitting the same face at the same time, which is why simplifying the room before recording still matters.
Why do skin tones still look strange after I match the Kelvin setting?
Because Kelvin is only part of the picture. Tint, source quality, mixed light, clipped highlights, and reflective surfaces can all affect how skin reads on camera. If the number looks right but the face still feels wrong, check the source and the tint before changing temperature again.
Final takeaway
Colour temperature is not just a technical setting. It is one of the fastest ways to change mood, protect skin tones, and make a shot feel deliberate. The simplest improvement for most creators is not finding a magic Kelvin value. It is choosing one source to lead, locking white balance, and keeping the room from fighting itself.
Before your next shoot, record two short test clips in the same position. One with all the room lights on, and one after you have removed the lights that clash with your main source. In many cases, that comparison will teach you more than another hour spent in the menu.